# Connecting Email Providers
If you use MailChimp, Campaign Monitor or Sendgrid, you can make use of our automatic upload to email service providers. Your design will be uploaded to your email platform of choice, without you having to export and upload it manually.
# Linking a Provider
To start the linking process, make sure you are logged into the Mail Studio website and visit the Designs page. Select any design - if you don't have a design yet, create one first. Hover over the design and click on the small arrow to open the context menu.
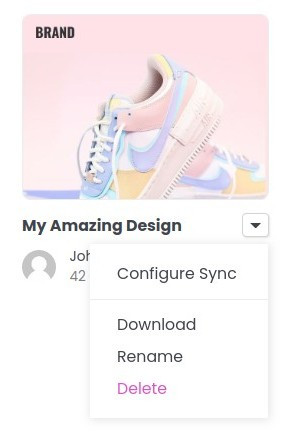
From the context menu, select the Configure Sync option. A dialog should appear with the supported Email Service Providers.
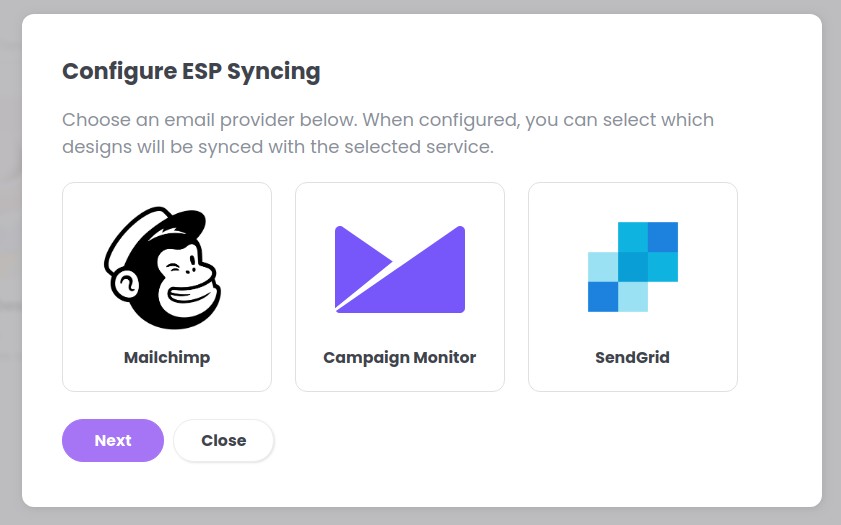
There is no limit on the number of email providers that can be connected to your Mail Studio account - you can use all the shown services simultaneously. However, each provider has a different process for authentication.
# Mailchimp
- Make sure you have an active Mailchimp (opens new window) account and that you are currently logged into it.
- From the Configure ESP Sync dialog, select the Mailchimp option and click "Next". You will be redirected to Mailchimp's site for authorization.
- By clicking "Allow", you will give Mail Studio access to the Mailchimp APIs. We use them only for uploading designs to your account and will not access any of your personal data.
- The setup is complete and you should see a success message at the top of the page.
# Campaign Monitor
- Make sure you have an active Campaign Monitor (opens new window) account and that you are currently logged in.
- From the Configure ESP Sync dialog, select the Campaign Monitor option and click "Next". You will be redirected to Campaign Monitor's site for authorization.
- By clicking "Allow access", you will give Mail Studio access to the Campaign Monitor APIs. We use them only for uploading designs to your account and will not access any of your personal data.
- The setup is complete and you should see a success message at the top of the page.
# Sendgrid
- Make sure you have an active Sendgrid (opens new window) account and that you are currently logged into it.
- From the Configure ESP Sync dialog, select the Sendgrid option and click "Next". A new dialog opens with a text field for entering an API Key.
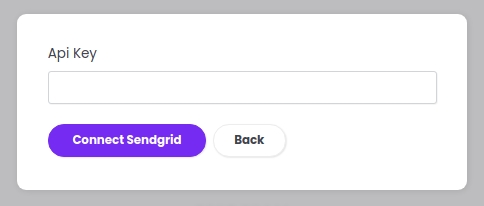
- Go to your Campaign Monitor account and look for the API key settings. You may need to create a new key if you don't have one. For more info on how to do that, check out the Sendgrid docs (opens new window).
- Copy the API Key into the dialog from step 2.
- By clicking "Connect ESP account", you will give Mail Studio access to the Sendgrid APIs. We use them only for uploading designs to your account and will not access any of your personal data.
- The setup is complete and you should see a success message at the top of the page.
# Uploading
Now that you've linked your email service providers of choice, you can start uploading your designs. Select a design you want to keep synced with your ESP and open the context menu.
You should now see the email platforms you've connected as sync options.
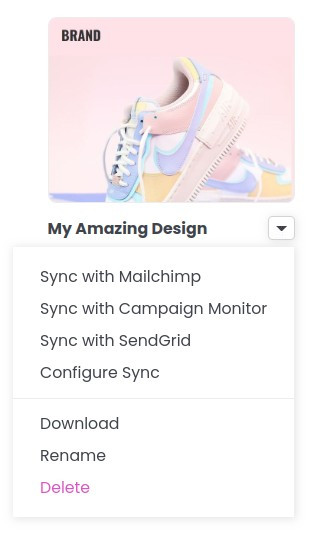
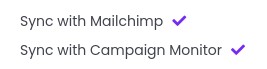
Click on the one you want to upload the design to and a blue checkmark should appear next to the option. If you've configured more than one provider, you can sync with all of them at once.
Syncing is now enabled for this design. The next time you make a change to it in the Mail Studio app and do a Save, the design will be uploaded to the selected email providers. Each service has a slightly different interface - in the ESP website look for Designs, Templates or Design Library to view your uploaded designs.
All the HTML and CSS of the design will be uploaded, as well as any images that you've used.
You can enable ESP syncing for all of your designs. Once syncing is configured, changes made in the Mail Studio app to that design will automatically update the respective template in the email platforms.
Note
The Sendgrid API does not support image uploads. You may need to upload images manually or preferably load them through a CDN (opens new window).